Many of us having many local drive partitions in our PC. There are lot of valuable and important data in those drives. So, in many case we want to hide some data from others to
avoid unwanted access.
In that case, it will not provide more security to hide a folder. Any
one can easily view those hidden folders. So, it would be better to hide
an entire hard disk partition from others to get a better security.
Yes, this is possible in all versions of Windows.
There are many third party tools are there in net to hide a partition.
But, Windows have a powerful option to hide a partition rather than any
other tools. We just use command prompt (DOS) to perform this operation.
Just do the following steps…
- Open the Run box by typing Winkey + R or Start->Run
- Type “cmd” in the Run box. (Without quotes)
- The command prompt will be open. Then type “diskpart” and hit Enter. (Without quotes)
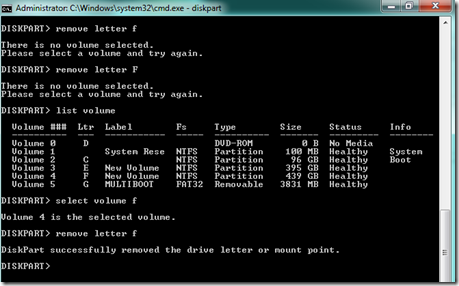
- Then type “list volume”. (Without quotes) Now, it will display all the disk partitions of your PC. (See below image)
- Then type the drive letter which you want to hide and hit Enter. (“F” is used in the image) Then the entered volume will be selected.
- Then type “remove letter f” (Without quotes) and hit Enter. (Replace “f” with your drive letter)
How to unhide the drive again?
OK. The drive was hidden. Then all of you ask me that how to get my
partition back? This is similar to the hide process. Just follow the
steps…
- Open the Run box by typing Winkey + R or Start->Run
- Type “cmd” in the Run box. (Without quotes)
- The command prompt will be open. Then type “diskpart” and hit Enter. (Without quotes)
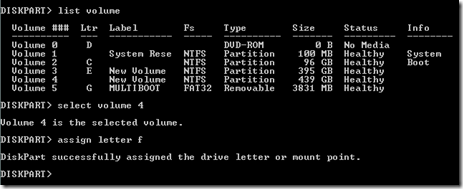
- Then type “list volume”. (Without quotes) Now, it will display all the disk partitions of your PC. (See below image)
- Then type the drive number which you want to unhide and hit Enter. (“4” is used in the image) Then the entered volume will be selected.
- Then type “assign letter f” (Without quotes) and hit Enter. (Replace “f” with your drive letter)
Comment here if you got any errors/problems in this. Don’t forget to subscribe here freely with your mail id.
You may also like…


No comments:
Post a Comment